
Table of Contents
This quick Jira tutorial will show you how to create a filter in Jira using advanced issue search.
Jira filter is an amazing feature helping project managers and agile teams to stay organized by creating and managing filters for multiple issues.
The best thing about creating Jira filter is that you can save your searches as a filter which you can manage, edit, and collaborate with other team members later.
If you are managing multiple projects having too many issues, then it might be possible that you slip some important tasks through cracks.
And here’s come Jira filters with a solution to segment important tasks based on multiple criteria.
For example, you can narrow down the list of only important tasks assigned to you, or else you can even filter issues by type (bug, epic, story, etc), and much more you can do by creating filter in Jira software to stay updated.
So, this is how Jira filters can make the job easy and if you are new to Jira then here are the steps you need to follow to create a Jira filter.
How to Create a Filter in Jira?
Jira software is one of the best bug tracking, issue tracking, and project management tools available in the market. You can find more information on https://testomat.io/blog/complete-guide-to-jira-test-management-tools/.
It is developed by Atlassian, an Australia based software company that builds and develops software tools for project managers.
As far as Filters are concerned Jira has very easy to navigate dashboard through which even beginner can set different filters by following below steps.
Step 1
Creating a filter in Jira starts by performing an advanced issue search.
For this, go to your Jira Dashboard and tap on the Filters option from top menu and select Advanced Issue Search.

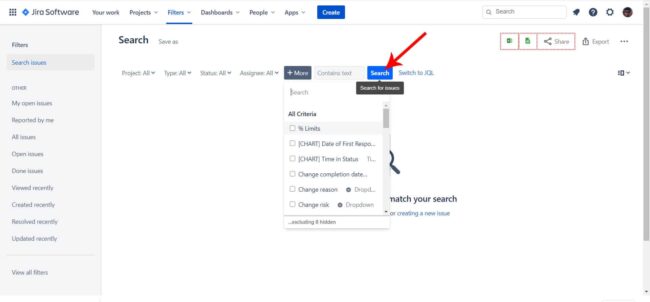
Step 2
Now, narrow down your issues by Project, Type, Status, Assignee, Label, Creator, Priority, Sprint, Start Date, and other dozens of criteria.
Next, you need to click on Search Button and Jira will show you all the issues based on Criteria you have selected.
Step 3
Now you need to check your search results to ensure that they are the ones you want.
Once you confirm your Jira search results, click on Save As to convert your search results into a filter.

Step 4
Next, you need to give a nice and unique name to your Filter so that you can recognize it easily in case you have created multiple filters in Jira previously.
This is it, you have successfully created Jira filter which you can later access, edit, subscribe, and collaborate from your Jira Dashboard in just few clicks.
FAQs Related to Jira Quick Filters
1) What is a Jira Filter?
Jira filter is a quick saved search done with particular criteria in mind to segment issues. Jira filters can be private or public based on project requirements.
2) How to Create Public Filter in Jira?
First, go to Filters>View All Filters and select yourself as the owner. Now, click on three dots and select Edit option. Here, you can select different access types such as Project, Group, Organization, Private or Public. Just select Public and click Save. However, public access option seems to be available for paid users only.
3) How to Subscribe to a Filter in Jira?
First, go to Filters>View All Filters and select yourself as the owner. Now, click on three dots and select Manage Subscriptions option. Next, click on Add Subscription and select require details and hit the save button. That’s it, now you will get an email notification when a new issue will be found.
4) How to Share Jira Filter?
To share filter in Jira, go to Filters>View All Filters and select yourself as the owner. Now, click on three dots and select Edit option. Here, you need to select the right option (Project, Group, Organization, Private or Public) with whom you need to share a Jira filter. This is how you can share Jira Filter.
Wrapping Up
It is worth to create Jira Filters as it saves time and helps you to stay organized.
If you are on a tight project deadlines and just started using Jira Software, then this quick and brief How to Create a Filter in Jira tutorial will surely help you out.