
Table of Contents
Before we start learning some simple methods of making a bootable USB flash drive, let’s first understand the term “USB Flash Drives”. It helps you to perform below steps on how to create a bootable usb drive with an ease.
USB flash drive is a data storage device that includes flash memory with an integrated USB interface. It is generally known with different names such as; USB drive, USB stick, thumb drive, pen drive, jump drive, disk key, disk on key, flash-drive, memory stick or USB memory.
USB Flash Drive is often used for storage, data back-up and transfer of computer files. It is smaller, compact, reliable, durable and able to store huge data.
If you have any old USB drive which you are not using then you can turn it into an operating install disk for Windows, Linux or Mac.
In this article we are going to learn how to create a bootable USB drive for operating systems like Windows (Windows Vista or 7, XP).
Steps to Create a Bootable USB Drive on any Windows PCs
Below are the steps you can apply to any windows PCs for making a bootable USB drive without any hassle.
Step 1 – Open the command prompt and run it as an administrator. To open the command prompt on windows PCs press “WIN + R”, you will get a pop up like below;
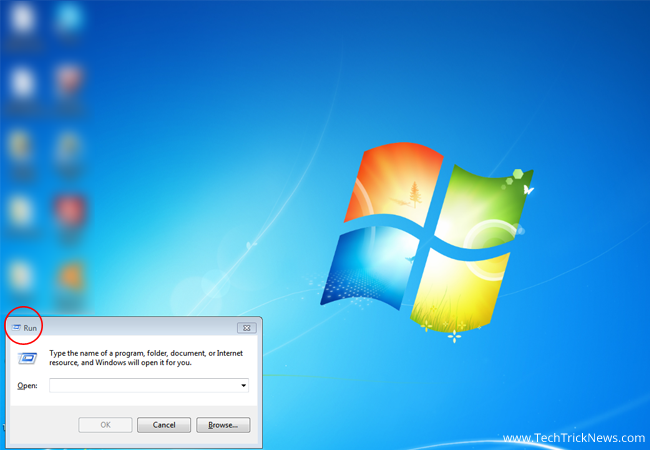
Now, type in “cmd” or “cmd.exe” and hit the Enter or tap Ok.
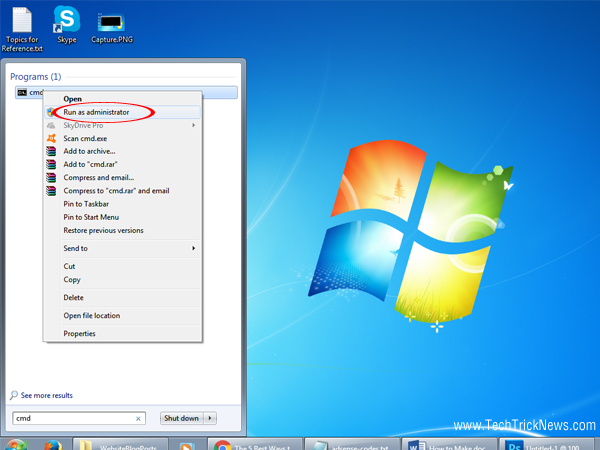
Another way to open a command prompt is to click on START icon and type in “cmd” or “cmd.exe”.
Computer will find a CMD program and show you in the menu bar, right click on the CMD icon and tap on “Run as Administrator, it will open a command prompt. Check below snapshot;
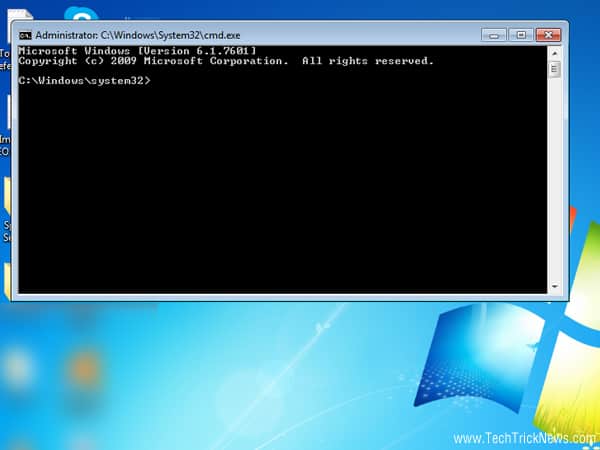
Once you have done it, you will see a below screen of command prompt –
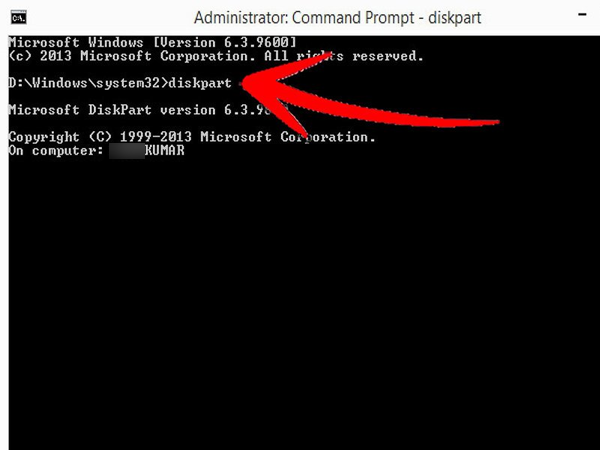
Step 2 – Now, open the disk management utility by typing “diskpart” without quote marks.
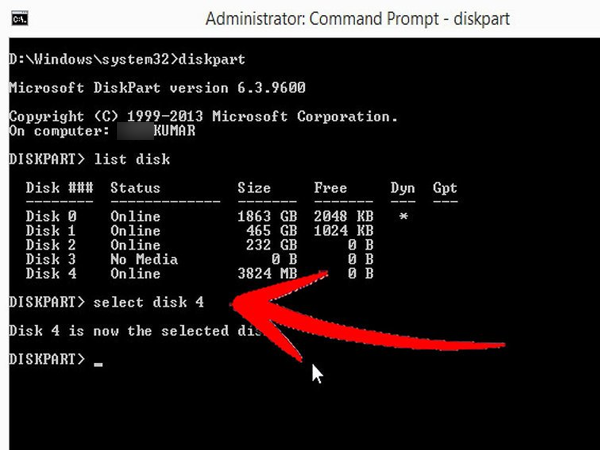
Step 3 – Display the connected disks by typing the command list disk. It will show all connected drives to your computer. Make sure that your USB drive is listed here.

Step 4 – Now select drive by typing select disk # command. (#) should be replaced with the number of your drive.
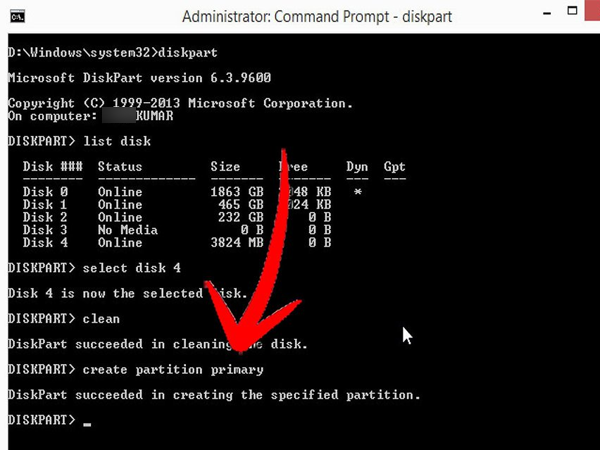
Step – 5 Type, clean command and clear all data saved in your USB flash drive.

Step – 6 Once you got this message “Diskpart succeeded in cleaning the disk.” Type create partition primary command to create bootable partition.
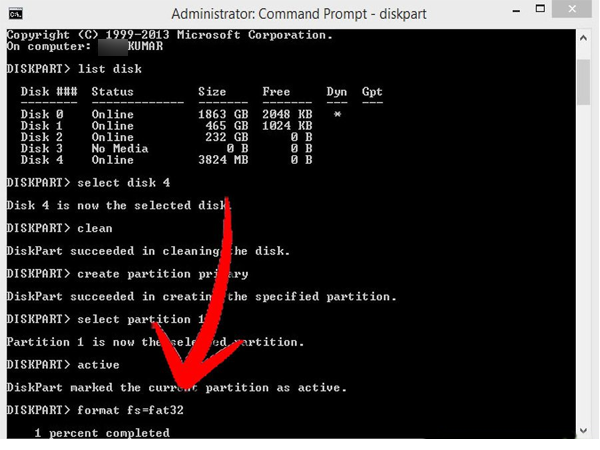
Step – 7 Type select partition 1 command and press enter, and once you get the confirmation message type active and hit the enter. It will activate the partition.

Step 8 – Now format the USB drive by typing format fs=fat32 or format fs=ntfs and hit enter. It will make the program work for a few minutes. You can check the progress in percentage.
Step – 9 Now assign a letter designation to your thumb drive by typing assign command. At last, end the disk management program by typing exit command.

Step – 10 Final step is to copy the window operating system once the USB flash drive has been made bootable. You can do this simply by dragging dropping using file manager/explorer.
How to Create a Bootable USB Drive on Windows Vista or 7?
If you are struggling for making a USB bootable on Windows Vista or 7 then read this step by step guide on how to create a bootable USB drive.
Step 1 – First of all get a free burning programs that can create ISO files. If you have Microsoft windows 7 with downloadable ISO file then you can skip this step.
With free burning program follow below steps;
- Insert Windows 7 DVD and open your burning program.
- In the menu, you will find an option like “Copy to Image” or “Create Image.”
- Save your ISO file. (It will be equal in size to your windows 7 DVD)
- Thus, it would eat up some space of your hard drive. So make sure you have enough storage space available.
- The process will take a long time. It depends on the speed of your computer and DVD drive.
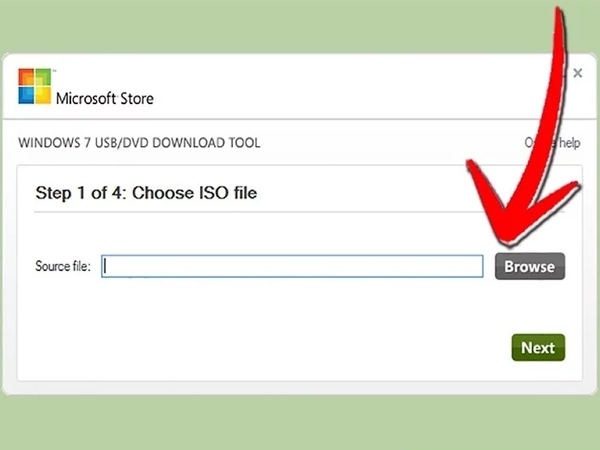
Step 2 – Now download Windows 7 USB/DVD Downloadable Tool. It is free tool of Microsoft and work well with Windows Vista ISOs as well. You can run this tool virtually on all windows OS.
Step 3 – Upload the source file, it is the ISO that you have downloaded in the first section.
Step 4 – Now, it will ask to choose either burn to a DVD or create a bootable USB device. Click USB Device.

Step 5 – Make sure that your USB flash device is connected correctly and have at least 4GB free space to copy over the Windows installation.
Step 6 – The program first format the USB device to make it bootable correctly, then copy your ISO file onto the drive. It will take up to 20 minutes depending on the speed of your computer.
Steps to Make Flash Drive Bootable on Windows XP
To create a bootable USB drive from ISO on Windows XP will take few minutes with below steps;
Step 1 – First, get ready with below things;
- USB_Prep8 and bootsect.exe (These are developer tools and freely available online.)
- 1GB flash drive
- Windows XP installation CD or DVD
Insert your USB device and windows XP installation disc. No need to interact with any autoplay windows, close them all.
Step 2 – Extract the USB_Prep8 .zip file and open the folder it creates and run usb_prep8.cmd. It will open a command prompt. Press any key to format the USB drive.
Note: In Windows 7, to make usb_prop8.cmd work, you will need to open a cmd as administrator and run it from prompt. Otherwise, nothing works.
Step 3 – Do not make any changes to settings of PeToUSB window. Once the format process will be complete, leave both windows as it is and start a new command prompt by pressing “W+R” and typing “cmd” into the text area.

Step 4 – Once boots extracted, navigate to the boots folder using new command prompt window. Now type, “bootsect.exe /nt52 Z:”. Replace the “Z” to the drive letter of your USB drive.
Make sure no windows showing the content of this USB device are open, otherwise operation will fail.
Step 5 – Once you done with the boots copying task, you will need to change 3 settings to Prep8 such as;
#Setting 1 – Press 1 and hit the Enter button. A “Browse for Folder” window will open. Choose the drive that contains your Windows XP disc and press OK.
#Setting 2 – Press 2 and hit the Enter button. If you have a drive on your computer that is already assigned to the letter T:, then change it to a free letter or you can leave this as it is.
#Setting 3 – Press 2 and hit the Enter button. Type the drive letter for your USB drive.
Step 6 – Now, you can start the copy process by pressing 4 and then hit the enter button. You will get a notification that, it will format your virtual disk. Press Y to continue. Once format done, press any key to continue. It will start the copying process, after few minutes a window will open with a question that do you want to copy TempDrive Files? Press Yes, and wait for up to 15 minutes, then press Yes for the next two windows that open.
Step 7 – Wola! Your USB has now become bootable and ready for windows XP set up on computer you want to install windows XP.
For this you need to set the BIOS to boot from a USB drive.
Follow the steps and make sure that you keep your USB device plugged in during the entire installation process.
Hope you guys find this guide on how to create a bootable USB drive or flash drive useful. If yes, then share it with your friends on social media and stay tune with us for more how to guides.
References;
www.wikihow.com/Make-a-USB-Bootable
![Read more about the article [Fixed] The File is Too Large for the Destination File System](https://www.techtricknews.com/wp-content/uploads/2021/04/The-File-is-Too-Large-for-the-Destination-File-System-300x200.jpg)

